Posts tagged embroidery tutorials
Tutorial Tuesday: Pink Flower Pattern

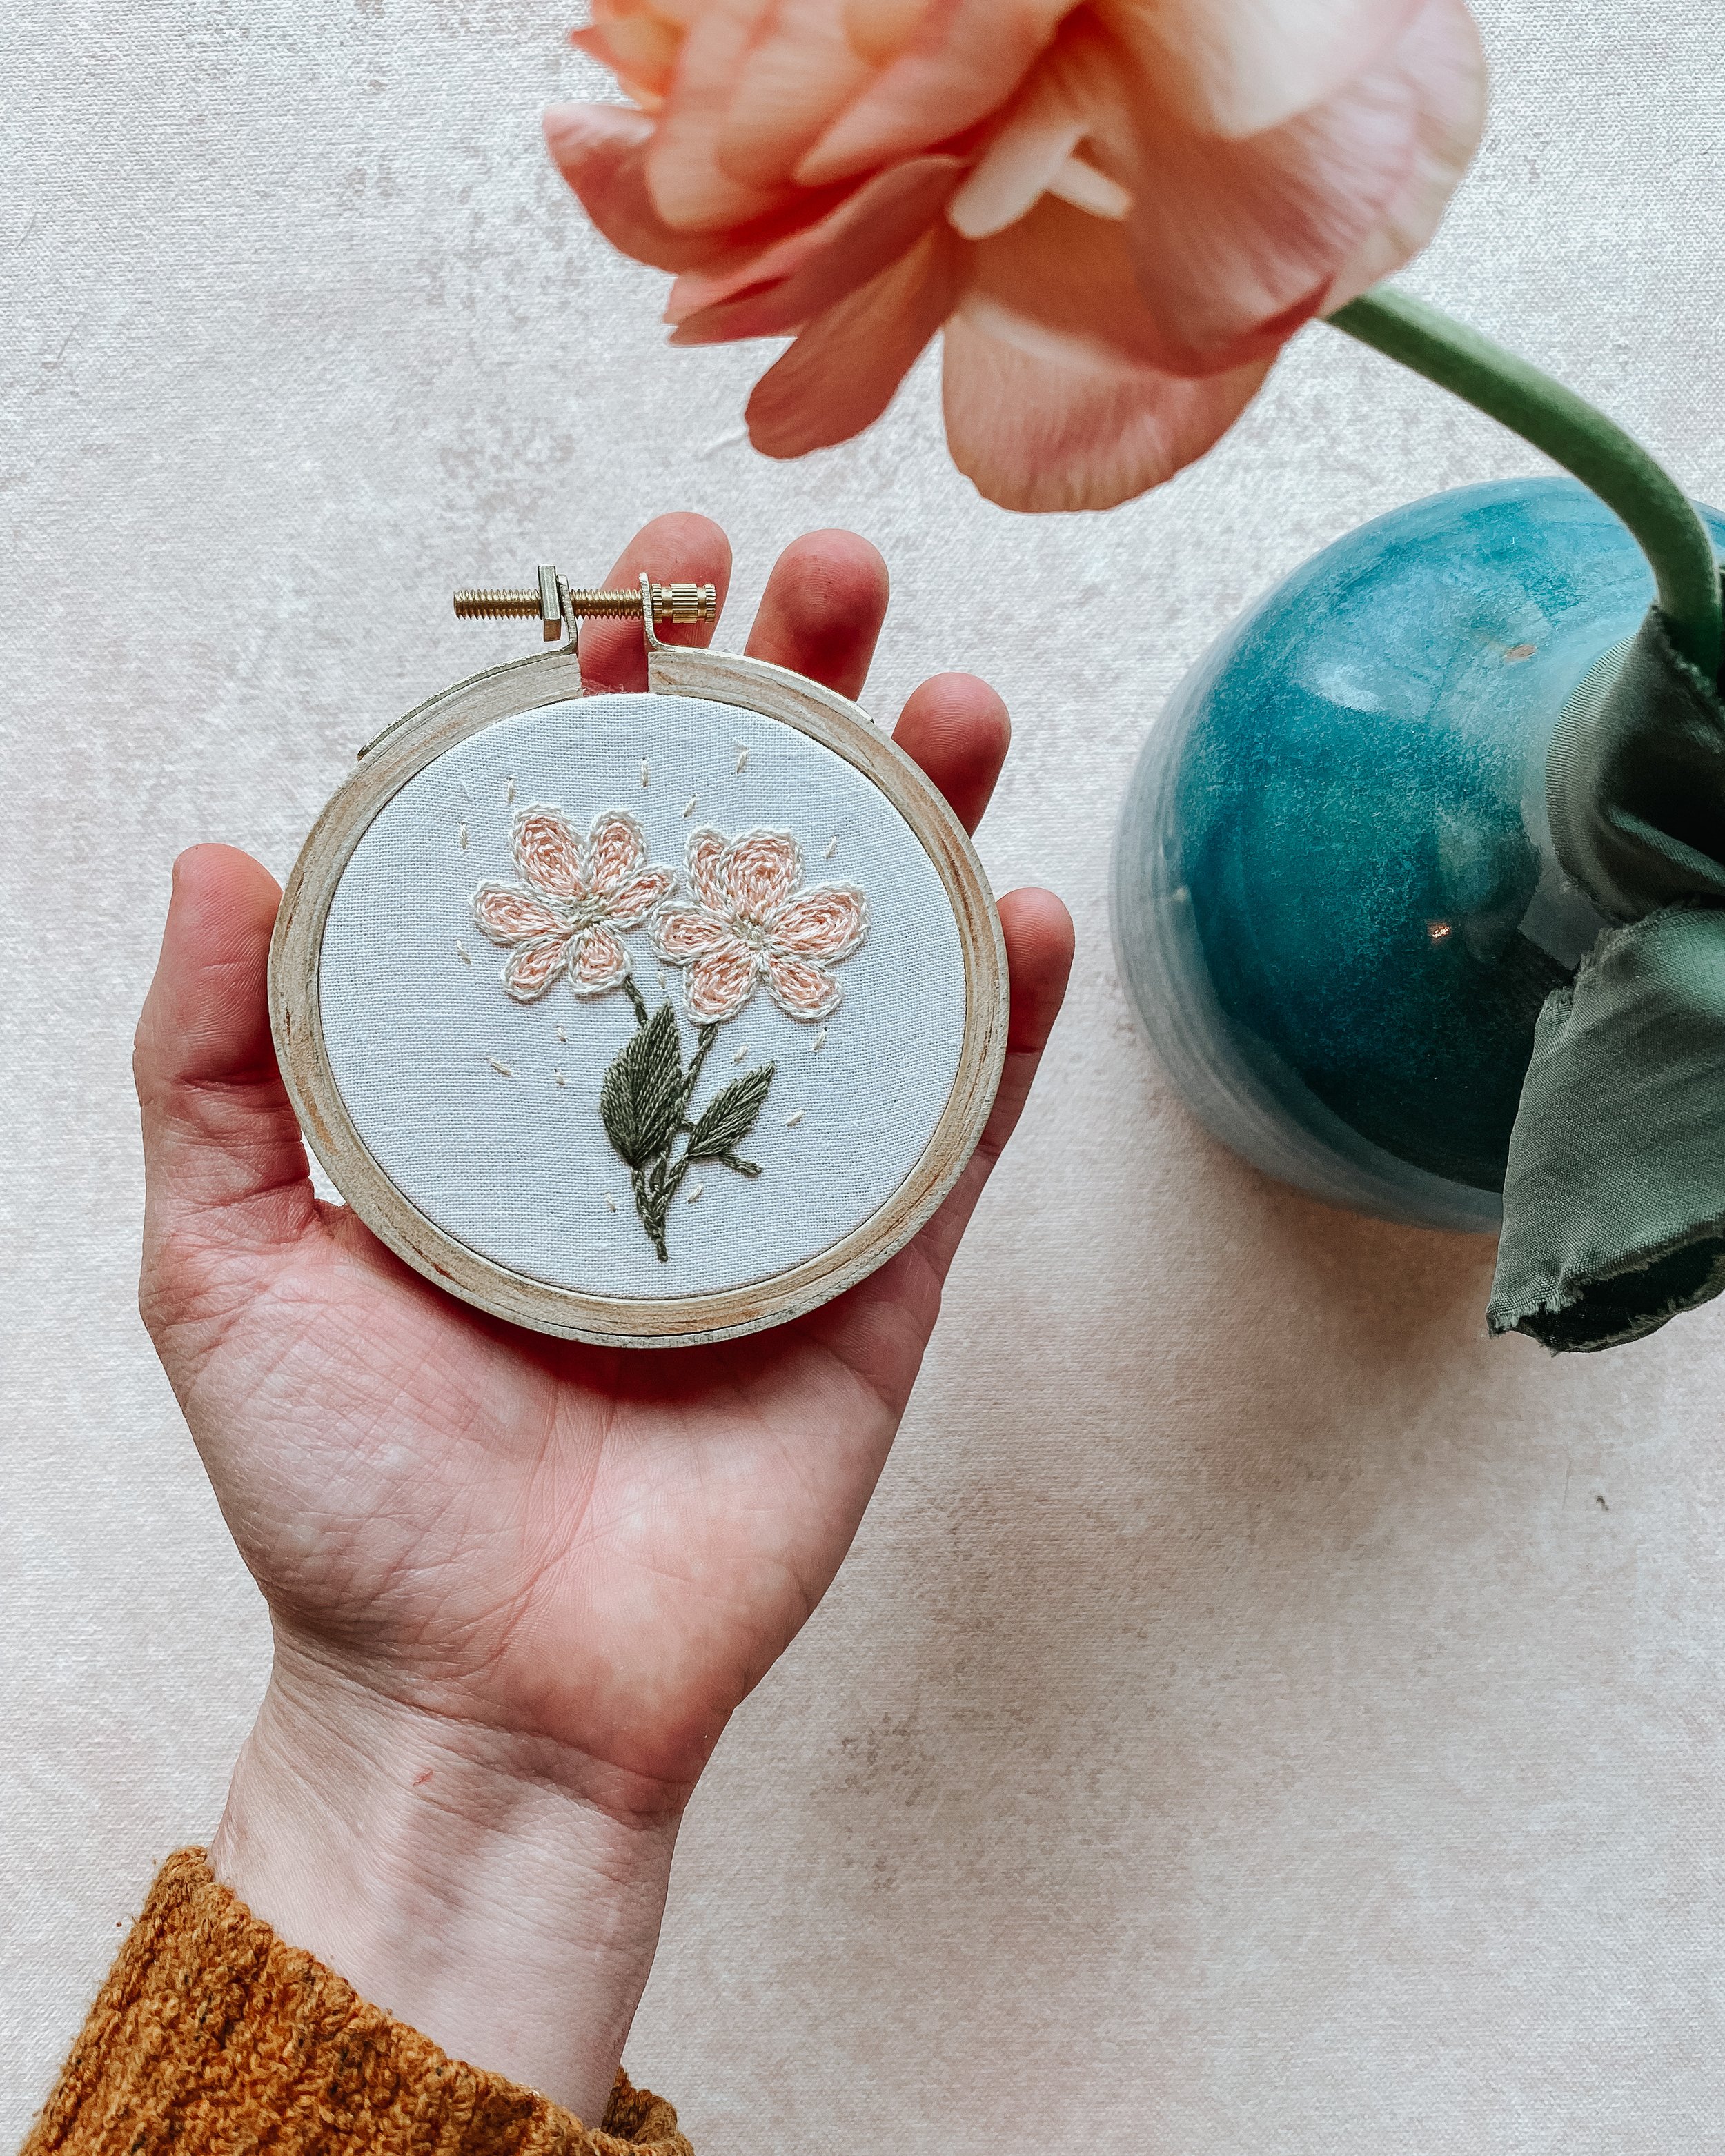
February’s Tutorial Tuesday Final Project is ready!!

Pink Flowers With Only 3 Different Stitches!

Those stitches all of our stitches from this month: Chain, Seed and Fishbone stitches! Hooray! This is our second full project completed for 2022. I’m just so excited to see how this little commitment to provide resources each week and a final project each month will turn out at the end of twelve months!

Thank you to everyone who’s shared their work along with the Tutorial Tuesday and who have participated in learning a new stitch or perfecting the ones they already knew! As the year processes, we will continue to get harder, more complex stitches going. We are going to learn A TON together!

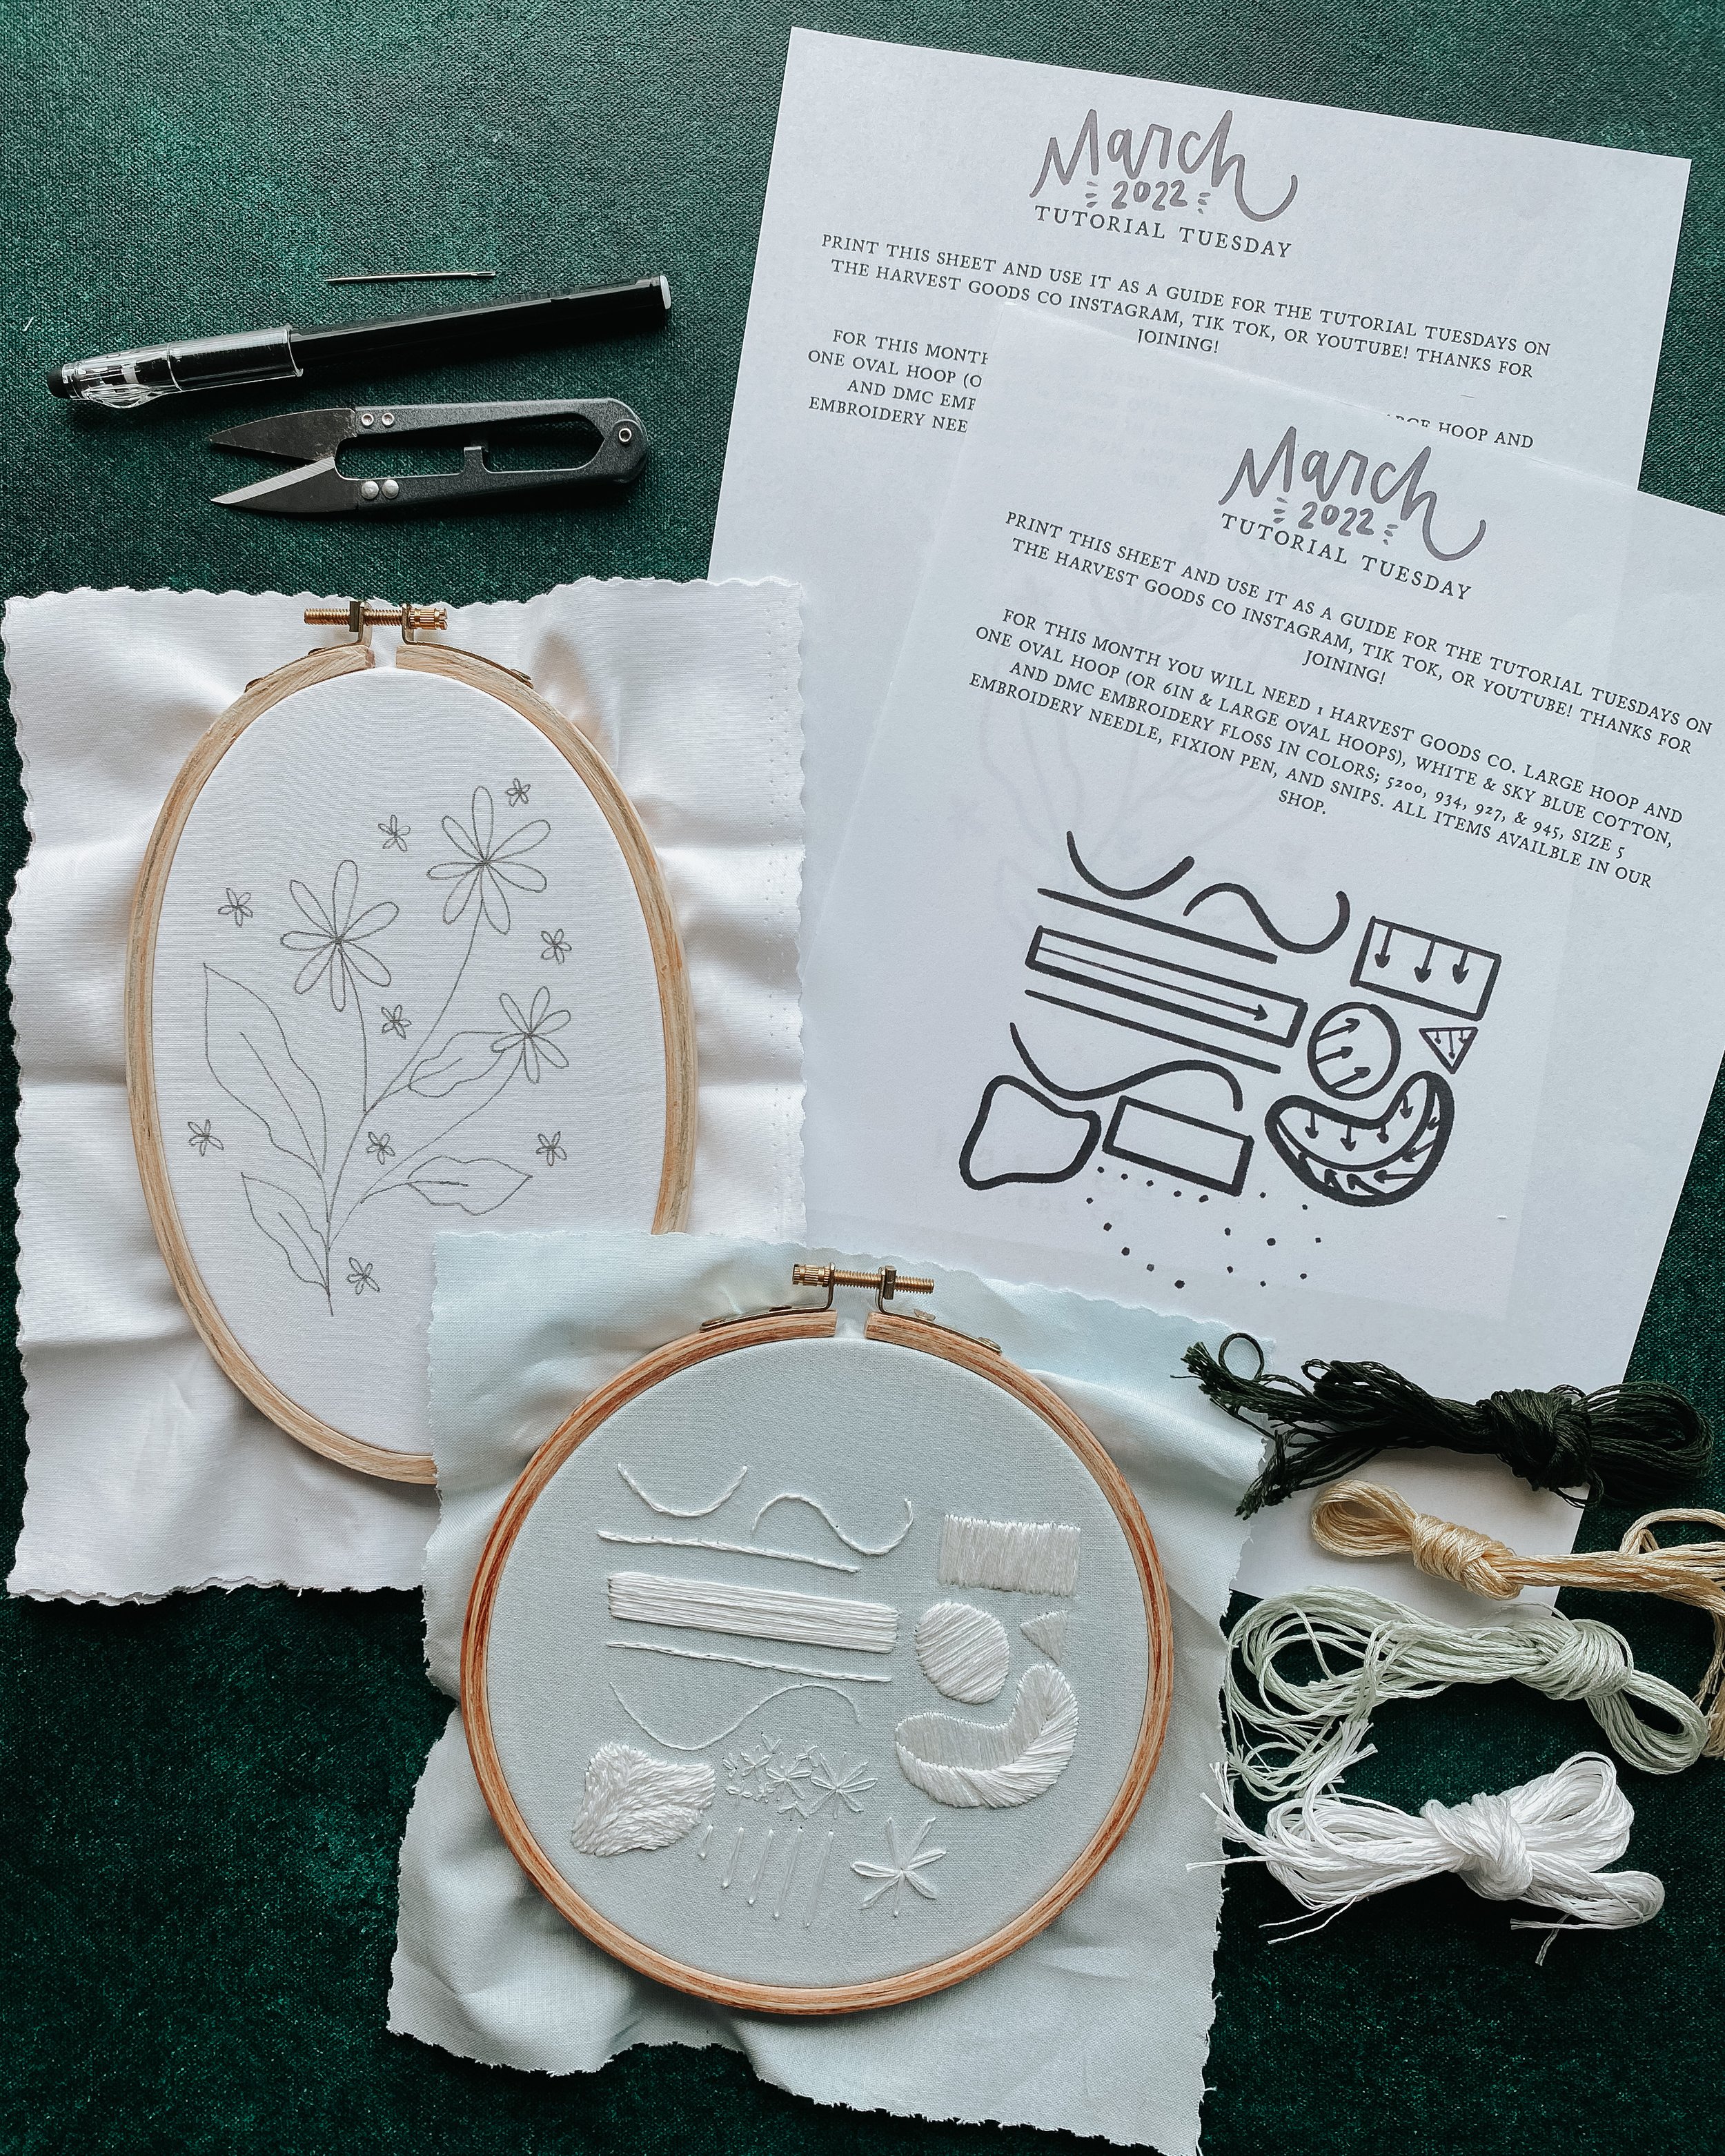
We are moving on to our next project and this month will have FIVE new stitches to cover! So now that we wrapped up this adorable pink flower design, we’re ready for the next one!

Tutorial Tuesday: Fishbone Stitch

The Fishbone Stitch

is the perfect stitch for filling in a shape, like a leaf or feather, when embroidering. This week for Tutorial Tuesday, we covering how to do this eye-appealing stitch!

Using 6 strands of floss, make a guide stitch from the top point of the lead to the center line.

Then starting on either side of the first stitch, stitch at a slight angle and overlap the end of the first ever so slightly. Each stitch should move down the leaf just a little bit. Switch sides with every stitch all the way down the leaf.

It ends up creating this beautiful, textured leaf!

DON’T FORGET TO GRAB YOUR FREE TUTORIAL TUESDAY DOWNLOAD PDF AND OUR SUPPLY KITS FOR THIS MONTH’S ACTIVITIES! ALL THE SUPPLIES USED FOR THESE TUTORIALS ARE BELOW!!

March Tutorial Tuesday Materials Are Here!

Embroidery Pattern PDFs & Weekly Video Tutorials

Okay, so we’ve now completed two whole entire months of weekly video tutorials and two mini projects completed using all of these stitches that we’re individually focusing on. I sure hope you’re all loving these weekly opportunities for learning and developing our embroidery skills! Are you having FUN yet?!

free download embroidery patterns pdfs with embroidery supplies

For March, we’ll be covering 4 new stitch techniques then have our final project that last week in the month. We’re also getting a bit more technical this month as we’ve had a few months to warm up! ;)

Remember each month, we offer the FREE download pdfs patterns for both the mini project and stitch techniques. And offer a pre-packed kit with all the supplies you need to follow along, It’s an easy add-on if you want to take all of the hardworking, time-consuming aspect of gathering supplies for the month’s worth of activities.

Can’t wait to see you there, starting next week!! Make sure to tag me when you post all of your beautiful creations on social media channels!!

Tutorial Tuesdays: Seed Stitch

Another Tutorial Video coming your way! This week’s Tutorial Tuesday covers the Seed Stitch.

It’s like little seeds or confetti sprinkled over your fabric for cute little details of delight! It may remind you of another stitch we’ve already covered and you’d be right! It’s the short stitch but with greater technique! Gradients are great ways to add depth and dimensions to your embroidery work! It basically levels you up.

This week we are working on seed stitch! To begin, use 6 strands of floss and fill in the first square with short stitches in various directions. It should look like confetti or sprinkles evenly through out your square. Try to keep all of your stitches similar in size.

Next we are going to practice a gradient. Keep your stitches tighter together at the top of the square and space them out as you move down the square. Keep the directions of each stitch varied throughout.

Finally we will practice a central gradient. Keep the stitches close together in the center of the square, and as you move outward, the stitches should become farther and farther apart.

Wahoo! See you next week!

Don’t forget to grab your FREE Tutorial Tuesday download pdf and our supply kits for this month’s activities! All the supplies used for these tutorials are below!!

Tutorial Tuesday: Chain Stitch

Welcome to February’s Tutorial Tuesdays!! We’re ready for more stitches to improve and a new mini project that brings them all together!

This week is the Chain Stitch

It’s an easy one to do, but looks complicated with its interlocking appearance.

This week we’re working the chain stitch. Here I am using 3 strands of floss.

Start by pulling your floss all the way through the fabric until the knot catches, then run your needle through the same spot and pull the floss through. This creates the loop!

Before pulling your floss all the way through, bring the needle through the loop, about one stitch lengths away from the beginning of your loop. Then pull the floss through, and that is the beginning of your next loop. Repeat this over and over! Experiment with different stitch length as you fill in the line.

As you practice the other shapes, keep your stitches short and tight around the curves. The tighter the curve, the smaller your stitches should be.

You did it! Join us next week for another fun stitch!

Don’t forget to grab your February free download for Tutorial Tuesdays and our $12 supply kit for this month’s tutorials!!

DIY Embroidery Kits

DIY Embroidery Kits

Options for Getting Creative This Year!

It’s the bread and butter of our small business and we love providing lots of different floral and botanical design options. Here are some options to getting DIY embroidery kits delivered right to your doorstep!

Individual DIY Embroidery Kits

We have full embroidery kit options. These kits provide floss, an embroidery hoop, the PDF pattern with lots of instructions & tips on how to complete your embroidery hoop art, a fabric square, and an embroidery needle. We also sell snips and a heat erase pen as add-ons if needed. Those are in the embroidery accessory section of the shop.

Basically, we try to take out all the guess work, time it takes to collect all of your supplies, and simply make it easy on you to create beautiful things! It’s the heart behind Harvest Goods Co. Making embroidery and creating accessible to everyone, and at all different creative skill levels. And to have timeless designs that you’ll love forever.

DIY Embroidery Kit Subscription

Want to level up?? We also have a monthly kit subscription that is mailed to you the first of every month! These range in skill levels and a new design is delivered every single month. A bonus to this option is not only do you receive everything in your kit, as mentioned above, but also a VIDEO TUTORIAL that literally walks you through visually of every aspect of the design and embroidery stitches needed to complete the design. This is great if you’re new to a stitch concept, or want to accountability to have someone “stitch along” with you as you complete the kit.

In addition to one-of-a-kind designs, subscribers also get access to these new kits earlier and at a discount than if you just purchased directly from the shop. Monthly savings, early access and other perks make these subscription boxes. These will be great for creatives wanting to have a little project each month, potential gifts, something for the kids to do…there’s lots these could be used for!

Tutorial Tuesdays DIY Embroidery Kits

Each month, we release a new Tutorial Tuesday DIY Embroidery Kit with materials for that particular month. The kit includes all the supplies and access to a FREE downloadable PDF with patterns and information. Each week of that month, we’ll focus on a new stitch to learn or level up the skill level of said stitch. We’ve covered a lot of ground already this year for January, and February. As the year goes on, things will get more complex and technical!

And the end of each month, we’ll create a mini embroidery art piece that uses just those stitches covered that month. The best part about these Tutorial Tuesdays is each Tuesday I’ll release a video tutorial with the stitch and information on how i do them plus expert tips for harder concepts.

You can go at your own pace, re-watch the videos, ask questions, and have someone to stitch along with you! Only we can both be in sweats, in front of the fire, snuggling with a cat or dog on our laps while creating something beautiful! I hope you’ll join us!

So, there you have it! Three different ways to get your DIY Embroidery Kits fix for this year from Harvest Goods Co. We hope to see you in our shop, using our monthly kits or joining us for the Tutorial Tuesdays!! And don’t forget to share what you’re making with us on Instagram!!

Tutorial Tuesday: Botanical Fern Embroidery Project

The end of our first Tutorial Tuesday is here! January’s mini project is this gorgeous fern, full of lovely details and perfect to practice all the stitches we just focused on this month.

This was a fun little embroidery art to complete, using the three stitches we learned this month! We covered:

Whipped Back Stitch, Long/Short Stitch & French Knots

Ready to make a fern to add to your botanical embroidery collection?!

Below is the video walking you through the completion of this sweet fern! And text boxes written out below!

Using 2 strands of the 3011, whip back stitch your stems focusing on one section at a time.

With 3 strands of 3011 and 1 strand of 934, long & short stitch the leaflets. Focus on one section at a time and allowing the angle to change as you move through each section. Stitch from the outer edge towards towards the stem. 3011 is on the outside and 934 on the inside.

With 1 strand of 950, add french knots around the stems and around the outside of the leaves for extra texture.

You did it! Join us next week for the start of a new cycle of learning and applying stitches!!

Don’t Forget to Grab your free download pattern & The next supply kit!

Barn Owl & Buttercups Kit Tutorial Step-by-Step

So many good things are coming down the pipeline this year. I’ve been so excited to share with you all each and every week for Tutorial Tuesdays Stitch Alongs and the monthly kit subscriptions tutorials. It’s been a whirlwind already!

Barn Owl & Buttercups Kit Video Tutorial

This winter bird kit for February was so fun to create! White Barn Owls definitely bring cold, snowy winter days to mind as they forage the frozen ground for nourishment. It was fun to bring this idea to life!

Enjoy your February kit & DON’T FORGET to tag me on Insta so I can see all of your beautiful creations!

Tutorial Tuesday: French Knot Stitch

We are back with our LAST stitch tutorial for January’s Tutorial Tuesdays before we undergo the mini project! The French Knot, while the name gives way to the French country of delicate and fashionable, originates way back to ancient Chinese embroidery! The first concept of the embroidered knot is known as the Pekin knot. Who knew?!

FRENCH KNOT EMBROIDERY TUTORIAL

Below the video tutorial covering the French Knot and the text within the video! Enjoy working on your French Knot!

Stitching a French Knot is so simple! Pull your thread through the fabric, pinch and pull tight the 2 inches closest to the fabric, and wrap it around your needle once. Then put your needle back into the fabric, keeping the floss tight, and gently pull the floss through. I’m starting with 2 strands of 3011 to practice tiny knots.

With each knot on the top row, add one more wrap around the needle to give each knot a bit more bulk.

Repeat these steps with 4 strands of 950, and 6 strands of 934.

Of course you have to boop your knot to make it official.

February Tutorial Tuesdays Supplies Are Ready!
embroidery kit supplies for tutorials and embroidery projects

All Embroidery Tutorial Resources Here!

February Tutorial Tuesday Resources have been uploaded to the site! So, everyone can be ready to go come next week!

I’ve been having so much fun creating these monthly projects & tutorials! And it looks like you all are too!

If you want to the whole kit-and-caboodle, you can download the free pattern pdf and also purchase the kit for February! It has all the raw materials you’ll need, besides snips & a heat pin (but those can also be purchased in our shop).

I know sometimes it’s just so much easier to have everything delivered right to your door to start crafting, so wanted to keep this option available to those who need it!

embroidery kit with video tutorials

Can’t wait to see you there, starting next week!! Make sure to tag me when you post all of your beautiful creations on social media channels!!

Tutorial Tuesday: Long/Short Stitch

We are SO excited about this Tuesday Tutorial Embroidery Stitch Along series this year. It’s been truly incredible how many of you have been participating this month already. We are ready for our second tutorial which is actually 2 Parts!

Long/Short Stitch Embroidery Tutorial

Below are both Parts and the text within each video so you can follow along each step of the way! We are filling in the second row of the free downloadable printable!

Above video is Part 1.

Start by using 6 strands of 934 and filling in the top half of the square with uneven vertical stitches. Then using 6 strands of 934, fill in the rest of the square using the same vertical stitches, letting the stitches overlap a bit where they meet.

Now fill in the circle using the same technique but using 3 strands of 934 on the top, 3 strands of 3011 in the middle, and 3 strands of 950 on the bottom. Instead of perfectly vertical stitches, use the guidelines to let your stitches follow the curve of the circle.

You’ll notice these stitches are shorter to allow for a better curve. Still allow your stitches to overlap where the colors meet. I like to pull my thread through the previous layer instead of stitching into a layer.

Now watch Part 2 below to make it smoother.

Below is Part 2.

Now using 3 strands of 934, follow the guidelines and fill in the outer half of the leaf.

Then using 2 strands of 3011 and fill in the 2/3 of the remaining white space. Still allow the stitches to overlap, coming through the dark green at the start of each stitch. Keep the angles close to the same to keep it more seamless.

Then using one strand of 950, fill in the remainder of the leaf. Each stitch should come through the previous mid-tone stitches.

To make it all fade together, use 1 strand of 3011and “shade” where the colors meet. You can use long and short stitch to stitch the stem (or you can use whipped back stitch from last week)

YOU DID IT!

Tutorial Tuesday: Whipped Back Stitch

Whipped Back Stitch Tutorial on our embroidery channel!

Here is the first tutorial for Tutorial Tuesdays!

Whipped Back Stitch

Below is the text overlaying in the video for your reference!

First, start back stitching the top line. Then, from one end of the line to the other, run the floss under each stitch, “whipping” it around every individual stitch. Make sure to come from the same direction each time!

Practice this with more complex shapes! It’s the same motion, just make your back stitches a bit smaller to keep the curves smooth.

Pro tip! When whipping your back stitching on a curve, run the needle from the inside of the curve (or inside of the circle).

You can also overlap your whipped back stitches! If you come to an intersection, just tuck your needle under the stitch on top and keep whipping it as you would normally.

Remember, get your supplies for the tutorials here!

Tutorial Tuesdays Embroidery Stitch Along
embroidery kit to practice stitches for DIY embroiders

Embroidery Stitch Along for 2022

Come practice a new hand embroidery stitch each week! Grab our free pattern sheets and a supply kit from the shop to participate.

For EVERY Tuesday (yes, EVERY!) of 2022, I’ll be sharing a short video that covers a new embroidery stitch! This is perfect for those just starting their embroidery craft or those wanting to really hone in on their already developing skill set. These videos will be both on Instagram and our Embroidery Channel.

So far, we’ve covered Whipped Back Stitch, Long Stitch, and Short Stitch in just the first two weeks of January.

I hope this adds a little creativity to each week and helps you fall in love with the simplicity and beauty of embroidery. By breaking each monthly project up into 3-4 different elements, it makes it all much less intimidating! Don’t forget to tag me on Instagram (@harvestgoodsco), so I can see and share all of your hard work!

HAPPY STITCHING!!